By the end of this module, you’ll gain experience with Kubernetes, Google’s orchestration engine for containers.
Module videos:
- Containers Demo [16:31]
- Kubernetes Overview [9:16]
- Kubernetes Quick Start Demo [9:53]
- Kubernetes Deployment Demo [17:06]
- Building a SlackBot with Cloud Build, Cloud Run, and Node.js Part 1 [13:20]
- Building a SlackBot with Cloud Build, Cloud Run, and Node.js Part 2 [19:09]
Docker Blurb
The point of this post isn’t necessarily to dig into containers however (we’ll assume that’s par for the course, though here is an overview on Docker to help you otherwise: Introduction to Docker.
You are arriving at Kubernetes in an interesting time. As of this posting, it recently announced that Kubernetes is planning to remove dockershim support, which enables communication between Docker containers and Kubernetes. Docker containers will still be supported, however that support is being moved from the Kubernetes codebase.
To understand how a container runtime functions, I recommend you check out this article.
As an aside, a great overview of both Docker and Kubernetes can be found here (put together by a former student): Brian Anstett - K8 Presentation.
Here is a short demo of running Cloud Build for containers, including creating a Docker image, pushing it to the Artifacts Repository, and then building/pushing it to the Cloud Build repository.
- Module video: Containers Demo [16:31]
- Quickstart
What is Kubernetes?
Note, much of this overview comes from the following two articles:
Module video: Kubernetes Overview [9:16]
Kubernetes is an orchestration service for managing containers, their deployments, and their configurations. Assuming we understand the purpose of the container (i.e., provide a fairly robust method for delivering a seamless application experience across different devices), Kubernetes sits on a layer above to enable oversight on container deployments.
Kubernetes can be configured via an API for initial/ad-hoc updates or by loading configuration files that specify all the particulars necessary for defining parameters such as namespaces, images, replicates, etc. (see Kubernetes Configuration)
Kubernetes comprises three aspects: a master node, worker nodes, and pods.
- Master node: manages the deployed cluster, supporting networking, API calls, scheduling, etc.
- Worker node(s): performs tasks running containers and their workloads
- Pods: wrapper for containers
Typically, scalability is enabled by adding pods (scaling up) or removing pods (scaling down). Let’s take a look at the architecture. Figure 1 (c/o kubernetes.io) shows all the components of a Kubernetes cluster:
Figure 1: Kubernetes Components (c/o kubernetes.io)
In Figure 1 we see the Master node (i.e., Control Plane) on the left comprising multiple managing services (i.e., kube-api-server, etc.) and etcd, the key-value store that manages Kubernetes cluster data. On the right we see the Worker nodes, where the pods are internal to the worker nodes.
Since we’ve been talking about pods, Figure 2 (c/o WikiPedia) shows a view of how they fit in with the Kubernetes scheme (the WikiPedia article is pretty good as well if you want another perspective):

Figure 2: Pod/Service Interaction (c/o WikiPedia)
Here, you see that each pod has its own IP address and encapsulates a number of containers. Essentially, the pod is the scheduling unit of Kubernetes – it is in charge of managing and running the containerized applications. Of note here is that each pod is a separate entity; containers within a pod can talk to each other directly (i.e., via localhost) but must access remote containers (i.e., within a different pod) via the other pod’s IP address.
Managing Kubernetes Clusters
We can interact with Kubernetes via the kubectl command - you’ll have used this when working with GKE and you’ll be getting more experience with it in this module. It is similar to gcloud in that we will be pretty much exclusively using it to manage our deployments (following all the initial gcloud setup commands for Kubernetes, that is). Now, there are a few more terms to discuss with respect to the types of things you’ll need to configure and manage when setting up and deploying GKE clusters:
Namespaces
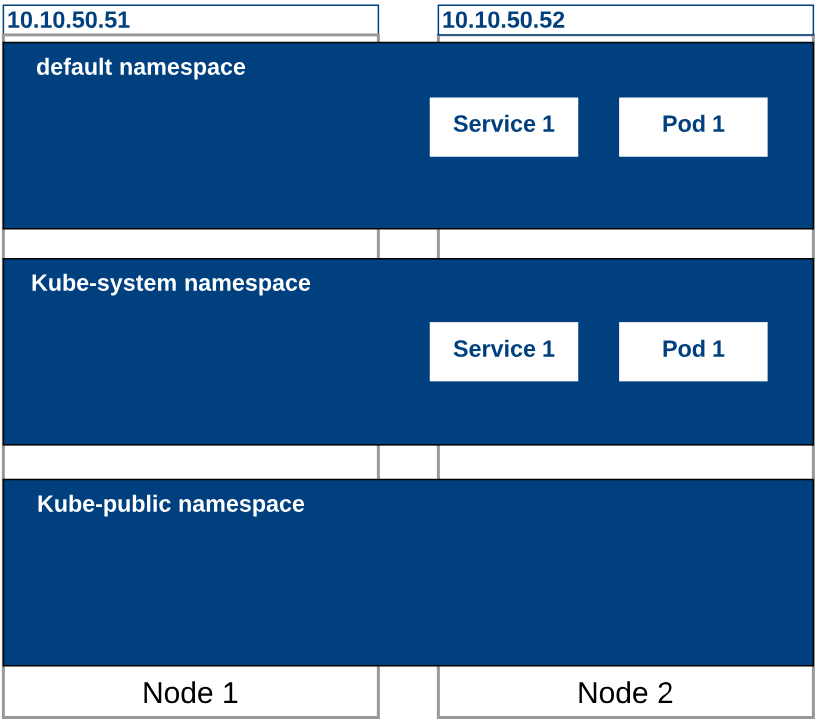
Namespaces provide a construct for holding the various aspects of a Kubernetes cluster, including pods, services, and deployments. You can also use a namespace to handle policies and authorizations as well. The following image (c/o theithollow) provides an example of how namespaces can be used:

Namespace example (c/o theithollow)
Effectively, a namespace is a method to enable separation of concerns within a Kubernetes cluster.
Labels
What is a label but a way to very quickly reference a thing? For Kubernetes, we consider a label to be a key/value pair for referencing some thing (or object, more formally). Here, we can label pods, ReplicaSets, etc.
For example, we might label a Pod to be either development or production:
apiVersion: v1
kind: Pod
metadata:
  name: i-am-a-pod
  labels:
    environment: production
    app: nginx
or similarly:
apiVersion: v1
kind: Pod
metadata:
  name: i-am-another-pod
  labels:
    environment: development
    app: flask
We could then select objects based on labels, with a lookup as follows (using kubectl):
$ kubectl get pods -l 'environment in (production) (using set-based requirements lookup)
See Kubernetes - Labels for more details.
ReplicationControllers
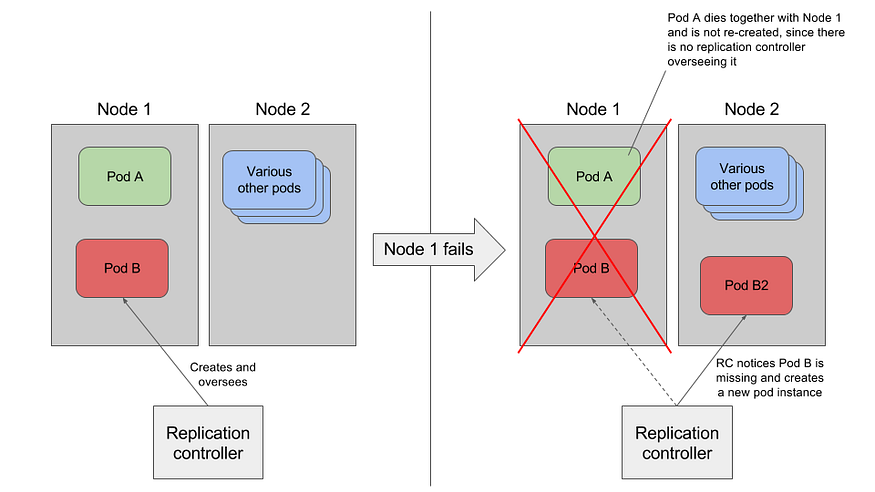
A ReplicationController ensures that your pods are always running! It is tasked with monitoring your cluster’s pods (typically via checking its health), and if the amount of available pods dip beneath whatever value you have configured in your manifest file, then the ReplicationController spins up a new pod. The following image (c/o marko.luksa@medium) demonstrates this feature:

ReplicationController Example (c/o marko.luksa@medium)
We have seen this as part of our manifest files already (or configured via kubectl), however we must specify the label selector, replica count, and pod template to define which pods to keep an eye on (i.e., in scope), how many pods should be running, and which template should be used for spinning up new pods, respectively.
For more detail, see: Introducing ReplicationControllers
Wrapup
These are just three of the highlights for setting up a deployment. For an in-depth guide on the considerations you’ll need (including examples of how to setup an nginx deployment), see this article: The beginners guide to creating Kubernetes manifests.
It will be best to gain some experience with setting up a basic deployment. The following Codelab and video are a good starting point for this:
- Module video: Kubernetes Deployment Demo [17:06]
- Codelab: Spring Boot Kubernetes Deployment
Cloud Build and Cloud Run
We have looked at Cloud Build and Cloud Run in the past (see Automation), however it is worth discussing again in the context of container orchestration.
Cloud Build
Cloud Build is a continuous integration / continuous deployment (CI/CD) platform that can be used for getting your applications ready to go. Think of offloading your build chain to the cloud (including versioning and deployments). A typical process would have you specify necessary build parameters (via YAML/JSON), upload your code to Cloud Storage, and then Cloud Build creates a Docker container to execute the build. Once the build is successful, the image is pushed to the Container Registry, where it can be pulled for application use or submitted to Cloud Run (next section).
The following image (c/o Google) shows a continuous delivery pipeline involving Cloud Build:
Cloud Build Pipeline (c/o Google)
This image walks you through the process that can involve Cloud Build. In essence, it is used to build and deploy your applications to be used elsewhere!
See Cloud Build Overview for more details.
Cloud Run
Cloud Run is one method for getting your applications out there! We have used it as a component of our process in the past (Cloud Build -> Cloud Run -> Access Publicly). Essentially, it is the managed service for executing your applications, where the managed aspect includes server deployments, scalability, etc. The following image (c/o Google) demonstrates where Cloud Run might fit in with a Firebase (next post!) deployment:
Cloud Run Overview (c/o Google)
The following videos takes you through using Cloud Build and Cloud run to create a bot for Slack! Fair warning, it involves cat emoji:
Additional Resources
- Introduction to Docker
- Container Runtime eFunctions
- What is Kubernetes
- What is Kubernetes? The Complete Guide
- Container runtime
- Kubernetes Configuration
- Namespaces Walkthrough
- Kubernetes - Labels
- Introducing ReplicationControllers
- Brian Anstett - K8 Presentation
- The beginners guide to creating Kubernetes manifests
- WikiPedia - Kubernetes
- Cloud Build Overview
- Cloud Run Overview


